A few days ago, some of my colleagues approached me regarding an issue with an Open Source application called Makaut Buddy which is a notes-sharing platform designed for our university, aimed at helping students share top notes, past exam questions, and YouTube tutorials efficiently.
While they had successfully developed a system for uploading resources, they encountered a challenge in ensuring that only authorized individuals could upload content.
As shown in the demo below, any user could create a resource after signing up. This posed a big problem because we could not regulate what users upload, some might’ve even uploaded harmful or disturbing content.
https://youtu.be/NVyf_wb-WPE?embedable=true
Initially, they defined an Admin role and granted a select group of individuals administrative privileges. However, as the number of roles increased, the code became increasingly complex and difficult to manage.
This is when I had the idea to write this article to raise awareness about efficient ways of managing authorization using a Role-Based Access Control (RBAC) model with the help of third-party authorization tools like Permit.
In addition to implementing RBAC, we also introduced a Request Access Approval system. This system ensures that any user who wants to upload content must first request access, which an admin can then approve or deny. This added layer of security helps us maintain the integrity of the content on Makaut Buddy.
In this article, I have used JavaScript as the programming language and Next.js as the framework. However, the concepts discussed here are not language-specific, and you can implement them in your preferred programming language.
By the end of this article, you will know to implement a basic RBAC model in your application.
With that said, let’s dive in!
What is Authorization?
Remember those mornings rushing to school? The security guard checking your ID is a perfect example of authentication. They're verifying your identity as a student allowed on campus. But that's just the first step. Even after being identified, you wouldn't just walk into any classroom, right? That's where authorization comes in.
Think of your class schedule as your authorization. It grants you access to specific areas (classrooms) based on your role (student enrolled in that class). You wouldn't be authorized to enter the teacher's lounge or the library's restricted section – even though you're a student (authenticated).
The difference between Authentication and Authorization is like asking “Who are you?” vs “What are you allowed to do?”
Why do we need an RBAC model for authorization 🤔?
Authorization is important in every organization as it prevents individuals from performing actions they are not authorized to do. This ensures the safety of the organization and helps prevent losses.
Let’s illustrate the above statement with an example:
In a company, there are some senior engineers with deep experience and some interns still learning the ropes. You can imagine the disaster it would cause if both the senior engineer and the intern had the same level of permissions. The interns who are still learning might unknowingly make some mistake for which the company will have to pay. In situations like these, the Role Based Access Control Model works the best because the permissions are not assigned to individuals instead the permissions are assigned to roles. For instance, only a senior engineer or tech lead can Delete Resources whereas all interns can only view and manage resources.
Next, let’s see how we can implement RBAC in an application.
How to implement RBAC in an app :
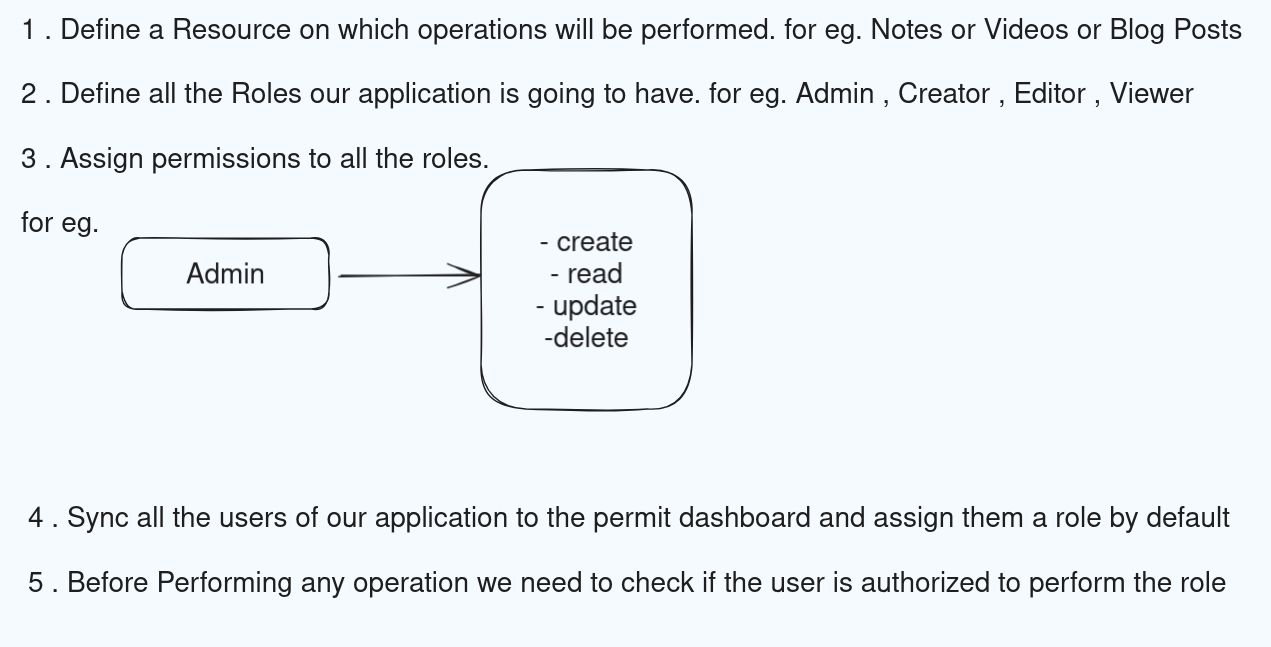
1. Define Roles and Permissions
First, we need to define roles and assign permissions to each role.
Note: A Role is the position or purpose that someone has in a organization, we need roles so that we can differentiate between individuals based on the permissions or privileges assigned to that role.
2. Assign Roles to Users
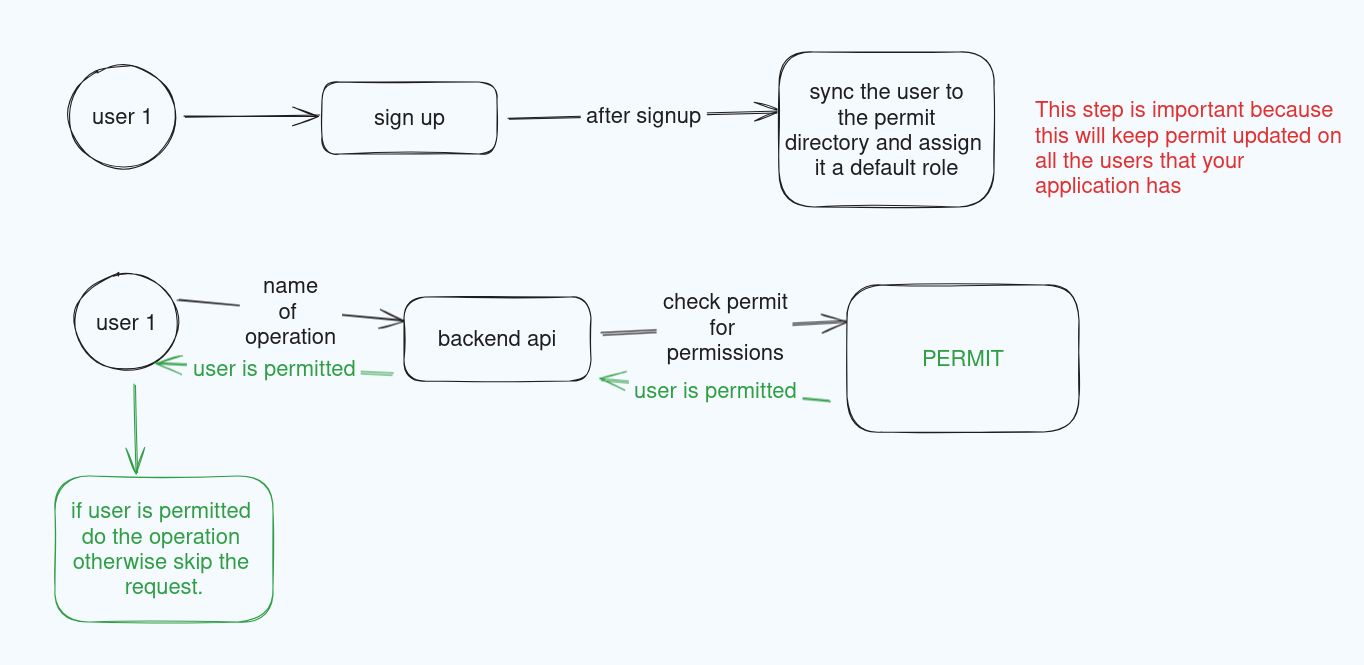
We need a way to assign a role to each user of the application. This is generally done after the user signs up.
3. Create an Authorization API
We need an API in our backend that takes in the operation a user wants to perform and checks the user's authorization. The diagram below will give you a better understanding:

However, we are not going to implement the entire model from scratch. Instead, we are going to use a third-party authorization tool called Permit which will make the whole process of establishing authorization very smooth and efficient for us, so that you can work on the features that really matter.
The below diagram shows you how we are going to leverage Permit to implement RBAC in our applications:
Implementing RBAC model
In this section, we will walk through the steps to implement Role-Based Access Control (RBAC) using Permit.
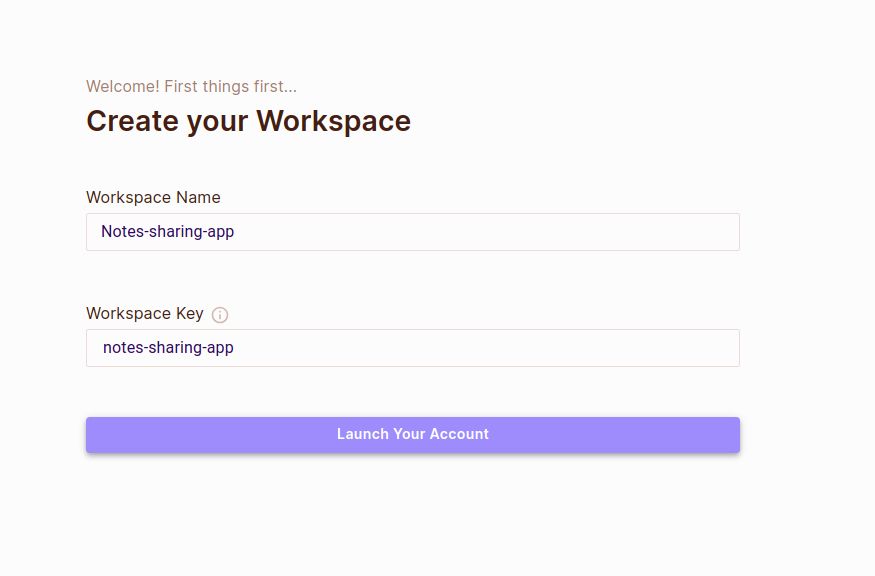
Step 1: Create a Permit Account and Workspace
As we are using a Permit for establishing an RBAC model, first we need to create a Permit account and a workspace :
Step 2: Create a Resource
Now we need to create a Resource which is the entity we want to control access to in our application.
For example, in a note-taking application, the resource would be Notes, and the actions could be Create, Read, Update, and Delete.
To create a resource:
- Go to the Policy section.
- Navigate to the Resources tab.
- Create a new resource by filling in the required details.
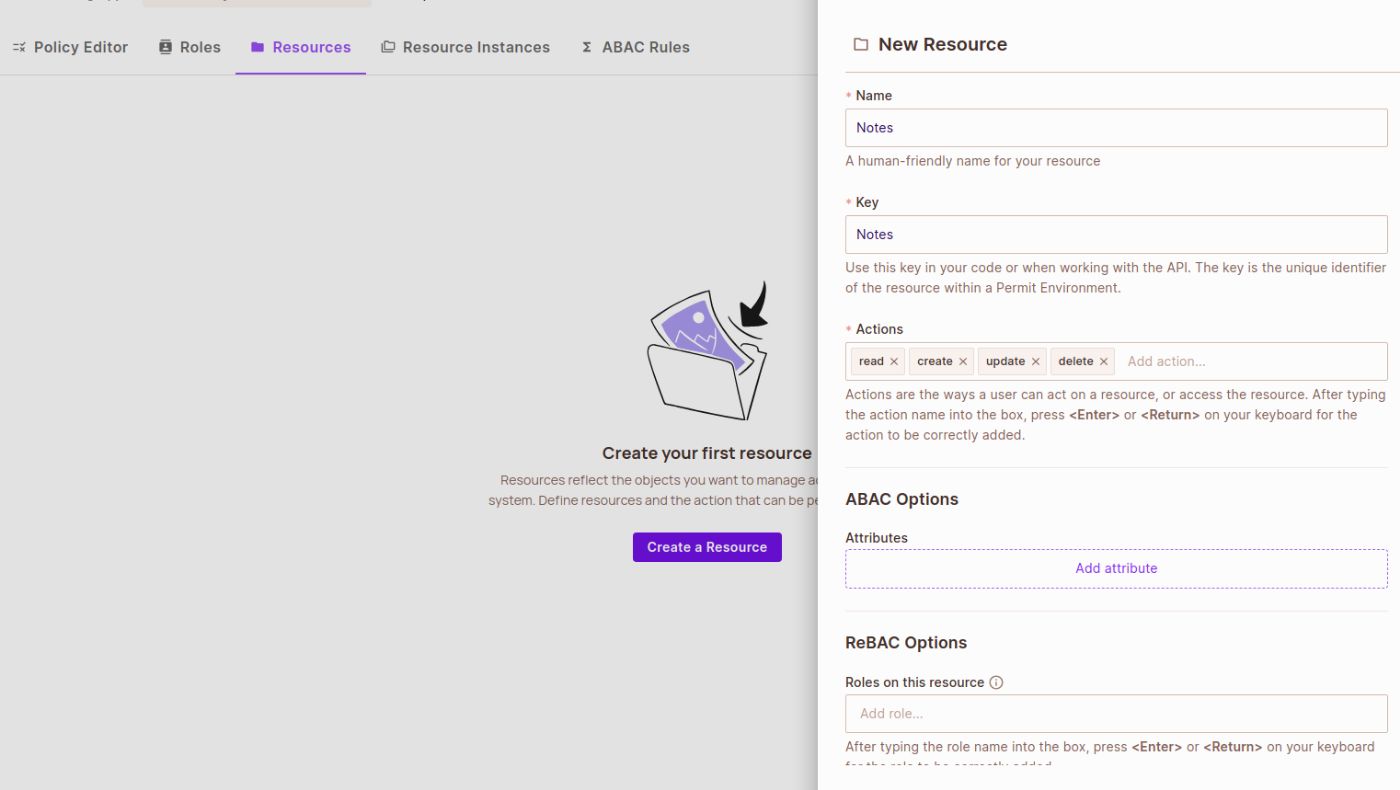
In the example above, the Resource name is Notes and the actions that the user is allowed to perform are Create, Read, Update, and Delete.
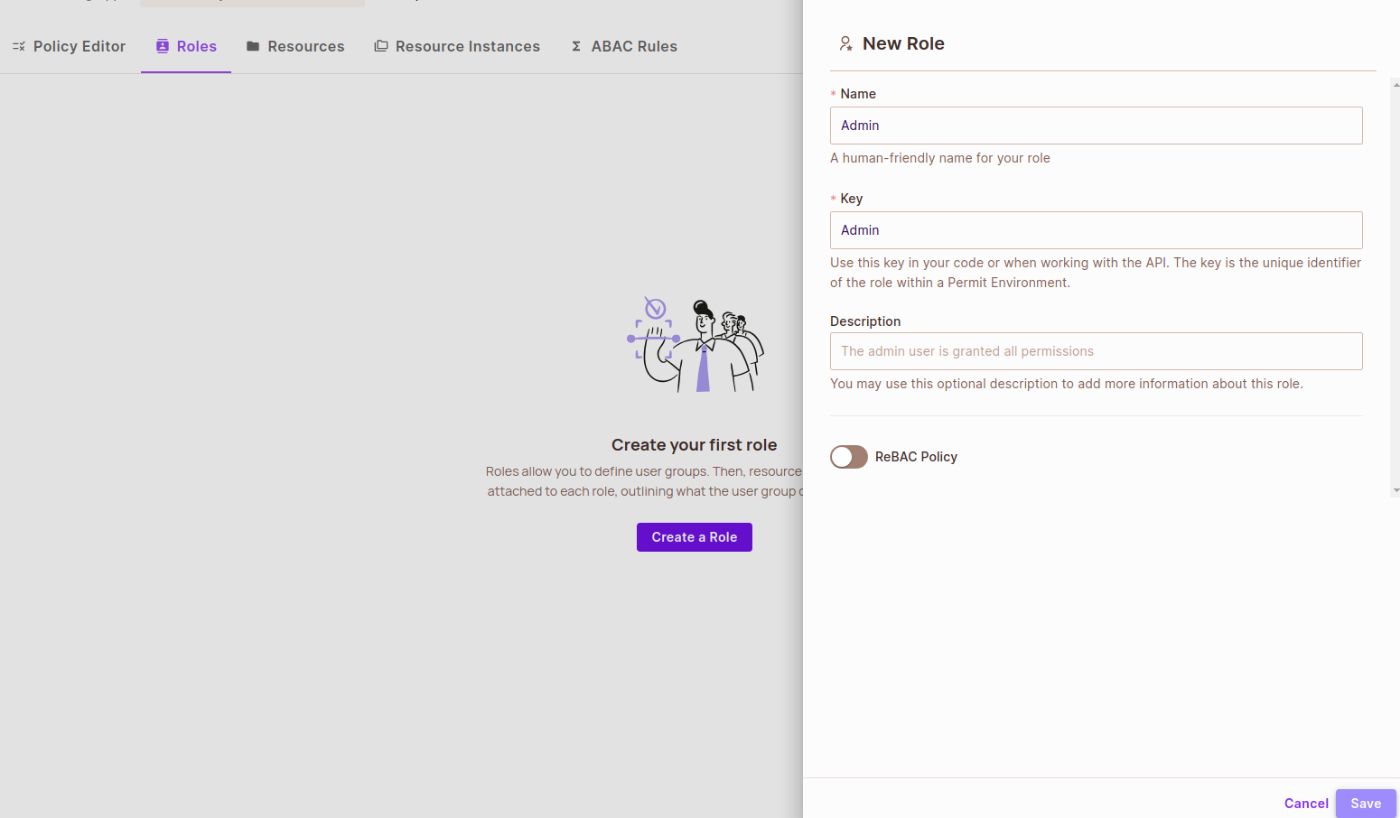
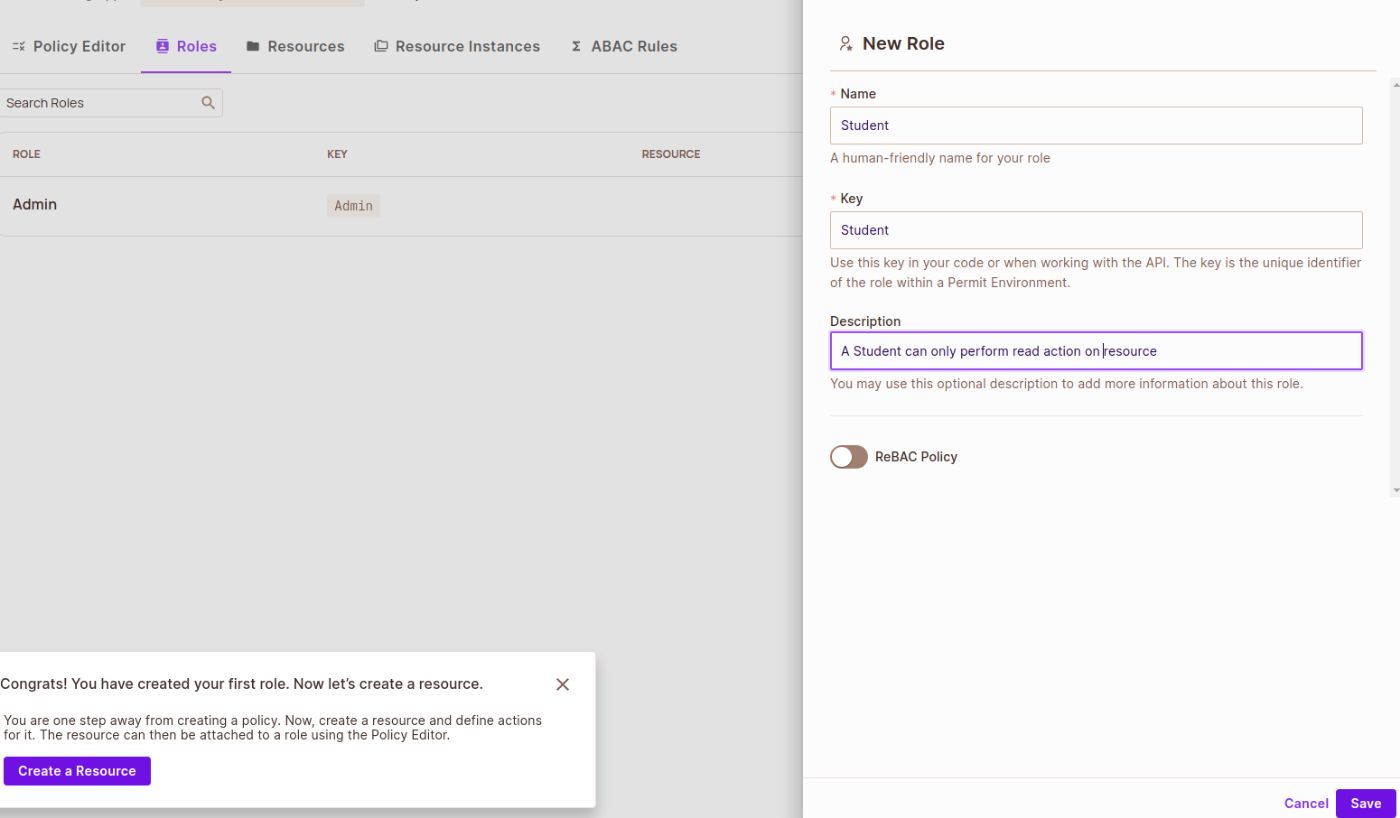
Step 3: Define Roles
After creating the Resource, we have to define the roles that are going to exist in our application.
In this case, as the application is a note-sharing application for a university, the roles are going to be:
- Admin: can create and read resources.
- Student: can read resources.
Step 4: Assign Actions to Roles
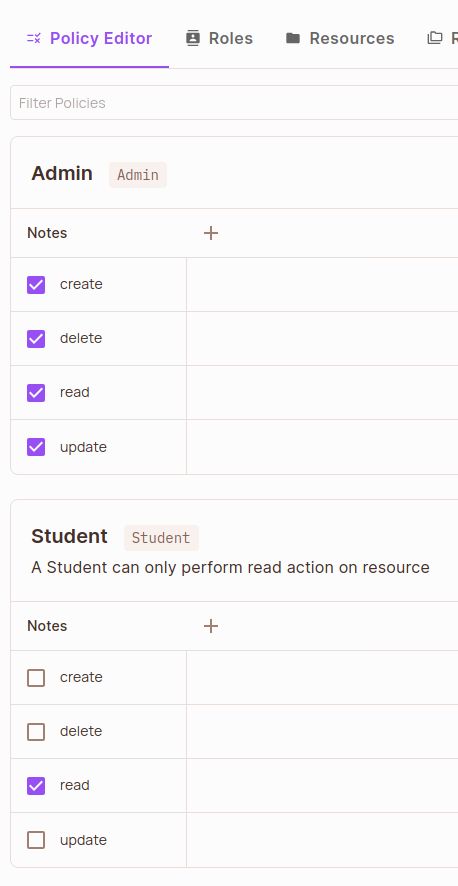
Once we have created both roles, we now have to assign the actions that each role can perform from our policy editor, as shown below:
Step 5: Configure Backend APIs
Now that your Permit account is configured, you can start creating the backend APIs to communicate with Permit. We will use the Node.js SDK provided by Permit. You can find the SDK for your preferred programming language in the Permit Documentation.
Sync Users and Assign Default Role
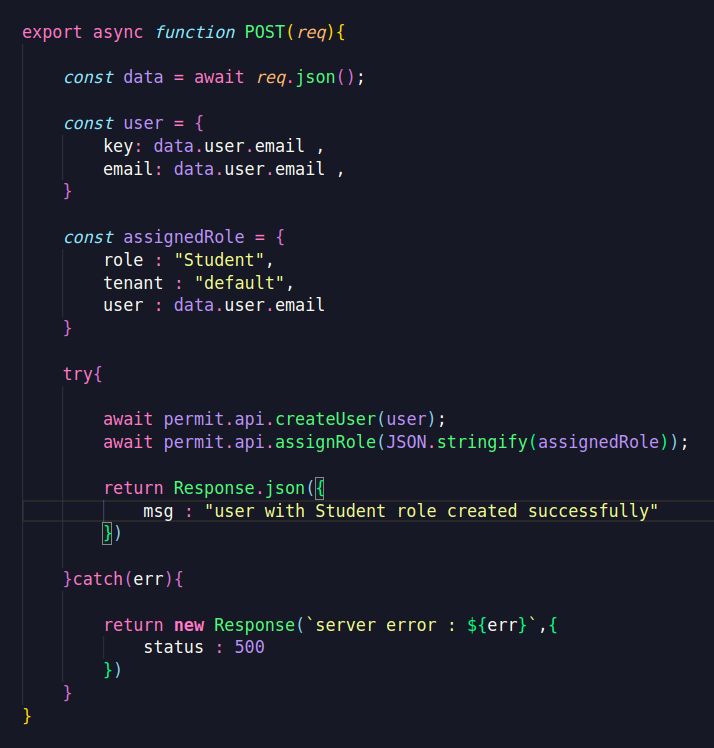
First, we need to make sure that each user that signs up in our application is synced to the permit directory and assigned a default role of Student.
To do this we need to create a backend API as shown below:

This API does 2 things:
- Initializes the Permit API.
- Creates a new user using the
createUserAPI. - Assigns a default role using the
assignRoleAPI.
You can read more about all the APIs that Permit provides at permit docs
Get User Role
Next, we need to create a backend API that gets the role of the user from Permit.io and sends it back to the frontend .
The API shown below gets the user using the permit.api.users.get(user_key)
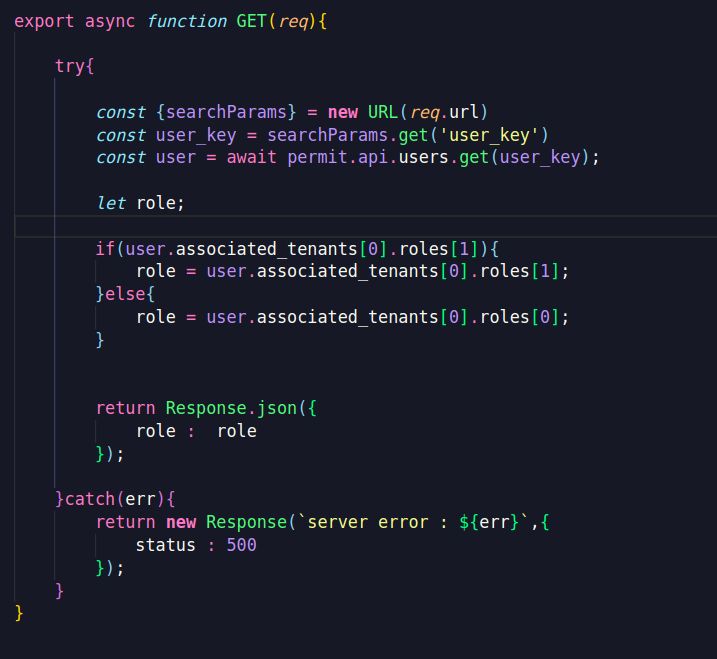
This API gets the user role with which we can manipulate our front-end components to allow only the people having special roles to be able to see it.
You can also check out the permit.check() function to verify if a user with a certain role is permitted to perform an operation.
With this, we have successfully implemented an RBAC model using Permit. Now, we can integrate the backend routes with the frontend framework or library of your choice to complete the setup.
Implementing Access Approval System:
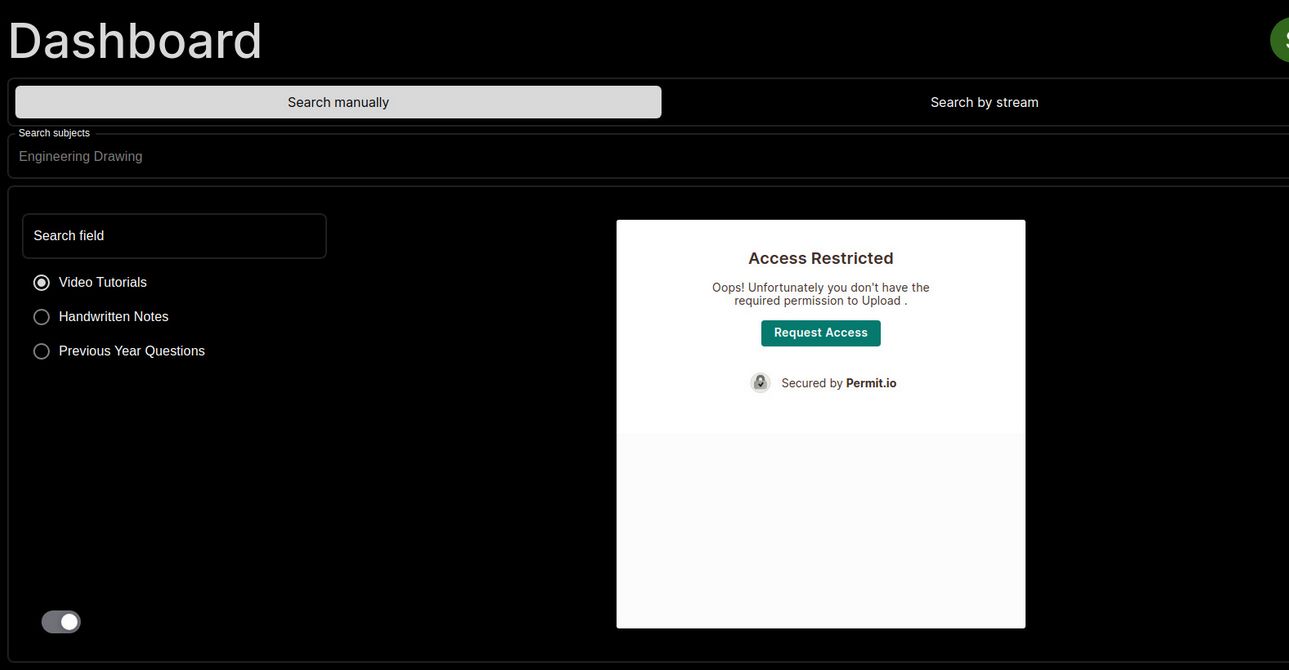
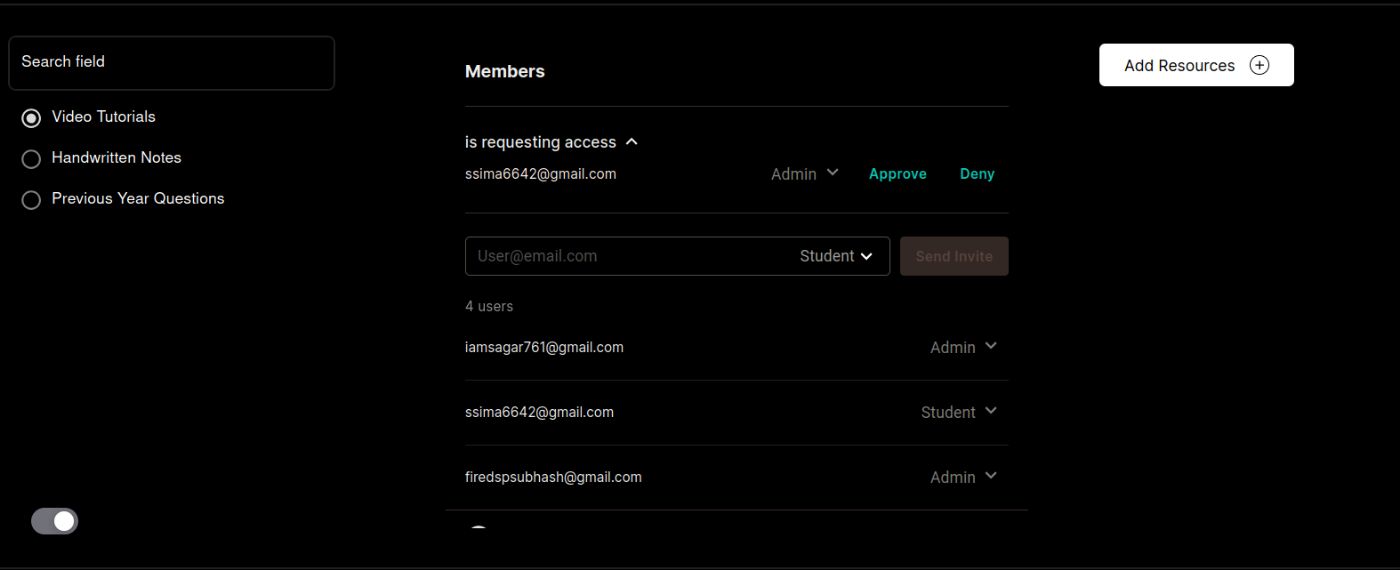
To complete our setup, we need a component that allows users to request role upgrades:
- A normal user without admin privileges can view the permit element and request admin privileges.
- An admin user can approve or deny incoming requests for role upgrades from other users.
Step 1: Create a Permit Element
Permit Elements are a part of “Permit Share-If” which is a suite of prebuilt, embeddable UI components that make access sharing in applications a breeze. Designed to provide fully functional access control, they make delegating permission management to your users simple and safe.
- To implement this, first, we need to create a permit element:
- Go to the Elements tab in the Permit Dashboard.
- Click on Create Element under the User Management section.
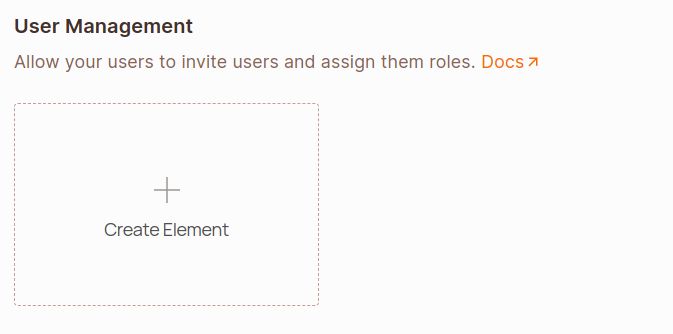
- Then we have to fill the form with required information as shown below
- Make the Admin role the workspace owner.
- Assign the Student role to the viewer section.
- Set the default role as Student.
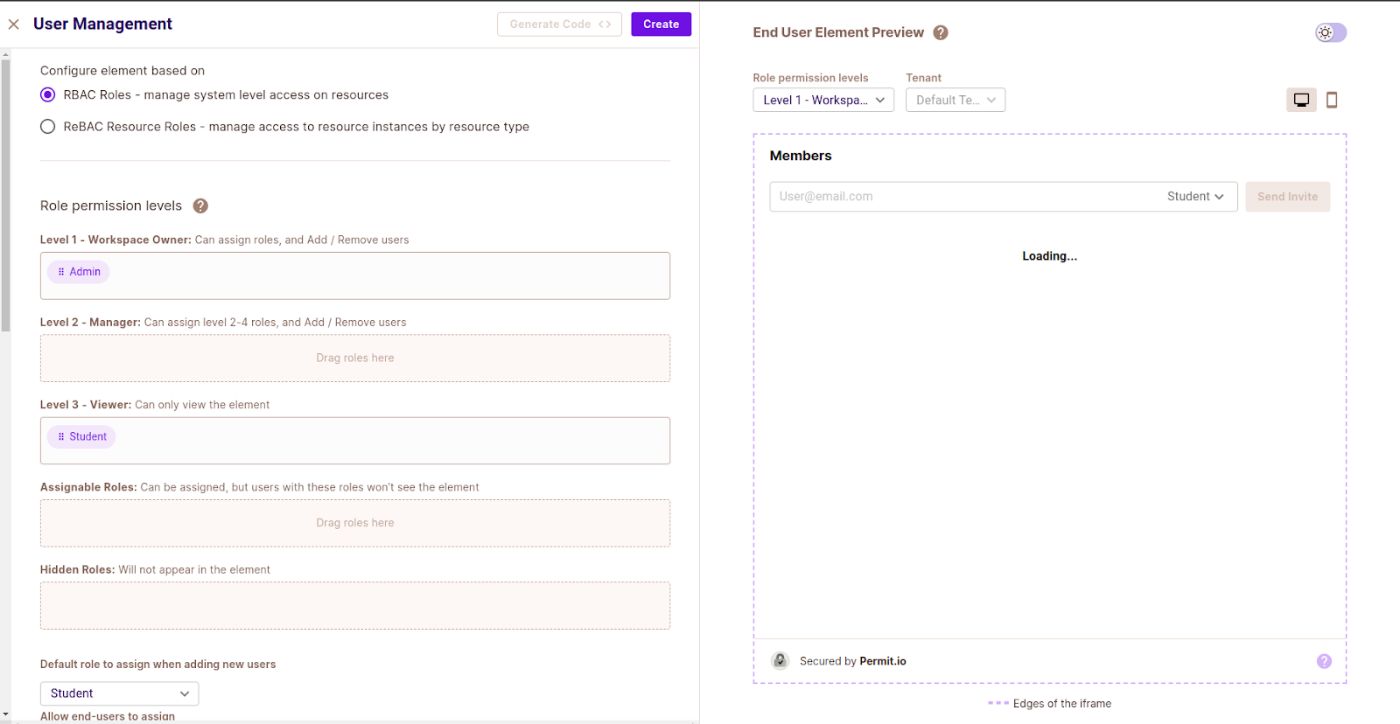
- Save the element and create a new element under Access Request.:
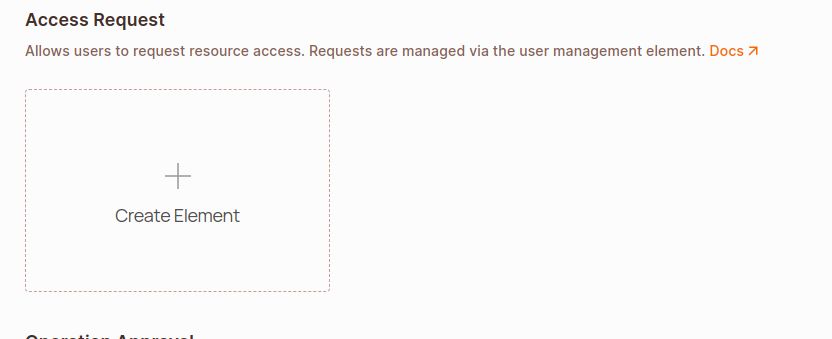
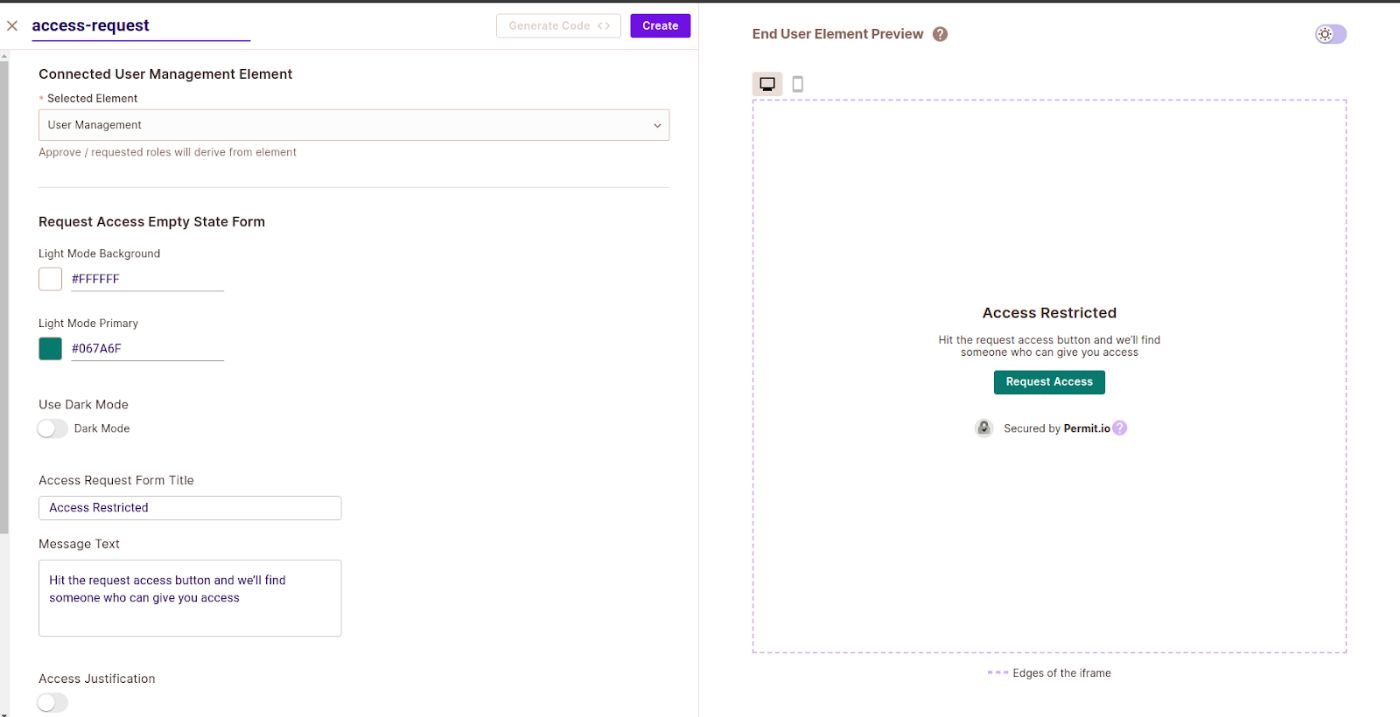
- Then fill in the Information for Access Request
- Select the User Management Element to connect your access-request element.
- Click on Create to finalize the element.
- Next, we’ll edit the User Management Element
- Go back to the User Management Element and edit it.
- Select the access-request element as the approval component in user management.
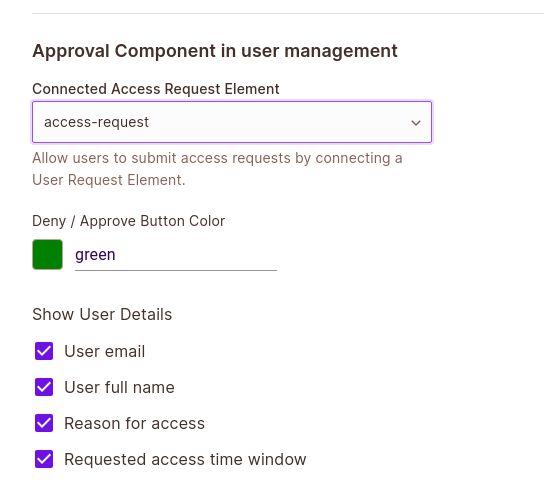
That’s it we’ve created the elements.
Step 2: Create Backend API for User Login
Before using the elements, we need to create a backend API for logging in the user to the permit element,
Note: It's important to log in the user as early as possible, preferably right after signup.
Now, let’s look at the code:
API code serving at endpoint /api/v1/login_permit/?userkey=user_key :

Step 3: Frontend Code for Implementing Login
The frontend code for implementing login will look like this:

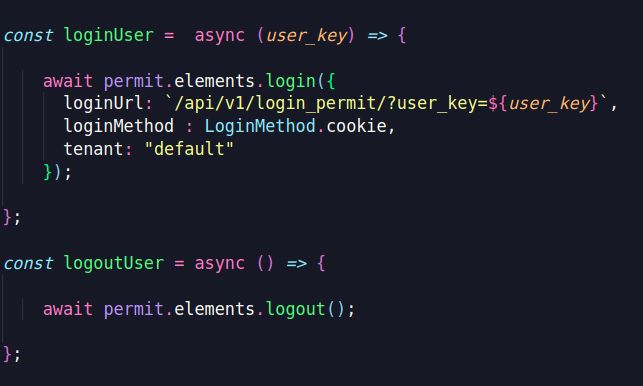
That’s it we’ve set up our code.
Step 4: Integrate Iframes into Frontend
Now, we just need to go over to the permit dashboard and copy both the user management iframe and access-request iframe, as shown below:
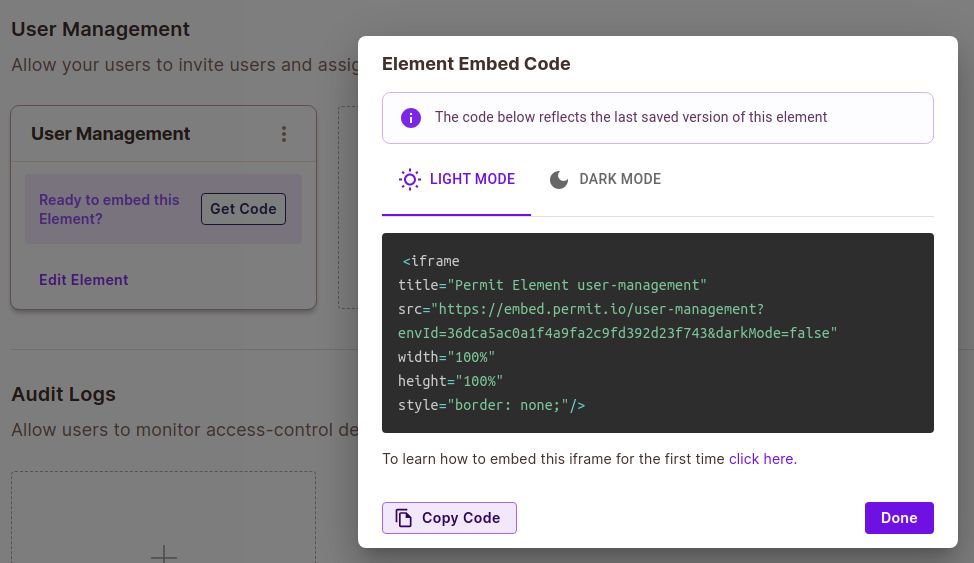
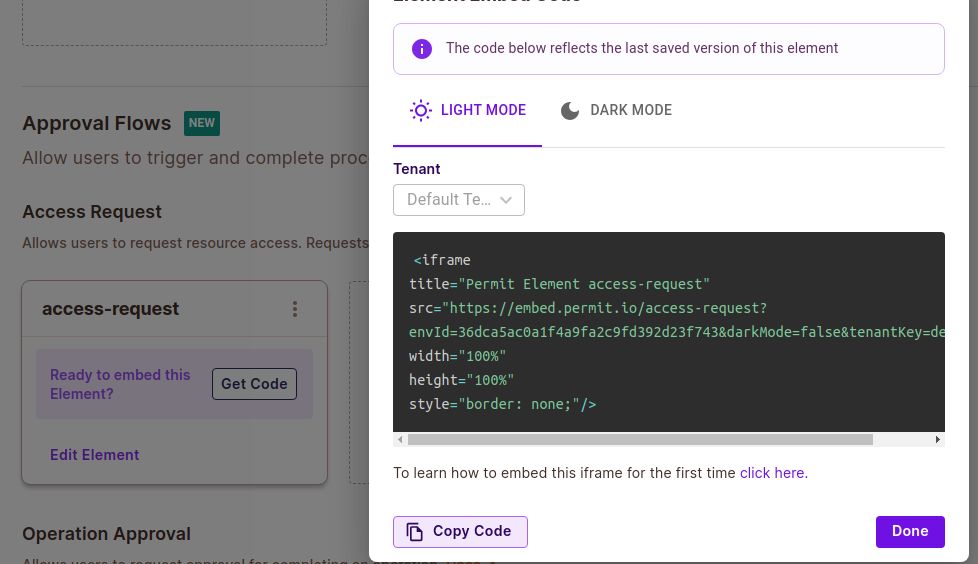
Now once we’ve got the code, we need to add the iframe to our frontend where we want to show the elements to our users, we need to:
- Show the user management element to users with the admin role.
- Show the access request element to users with the student role.
With this, we have successfully set up an access approval system where users can request role upgrades, and admins can approve or deny these requests.
Demo of RBAC in a notes-sharing application
- Demo: Admin Access to Upload Widget
This demo shows how a user with the "Admin" role can access the upload widget
https://youtu.be/xWQDI5N2TdM?embedable=true
- Demo: Student Role Restrictions and Access Request
This demo illustrates how a user with the "Student" role cannot see the upload widget and can request an upgrade to the "Admin" role:
https://youtu.be/Es69s8qiEog?embedable=true
- Demo: Approving Role Upgradation
This demo shows how privileged users can approve role upgrade requests:
https://youtu.be/sz8TaNk9OZE?embedable=true
- Demo: Upgraded Role Access to Upload Widget
This demo demonstrates how a user, after being upgraded from "Student" to "Admin," gains access to the upload widget
https://youtu.be/l5YaWi88n0o?embedable=true
Conclusion
That’s it!
Thank you for reading this far.
In this tutorial, we explored authorization and understood why authorization is very important in any application. We also looked at how we can set up and configure Permit to secure the application and control user access based on their roles.
This article is just the tip of the iceberg of authorization and the RBAC model. You can look into ABAC and ReBAC for more fine-grained Authorization.

